Dependency injection with Dagger 2 - the API
This post is a part of series of posts showing Dependency Injection in Android with Dagger 2. Today I’d like to delve into a fundamentals of Dagger 2 and go through a whole API of this Dependency Injection framework.
Dagger 2
In my previous post I mentioned what DI frameworks give us - they wire everything together with as small amount of code as it’s possible. Dagger 2 is an example of DI frameworks which generates a lot of boilerplate for us. But why is it better then the others? Rigth now it’s the only one DI framework which generates fully traceable source code which mimics the code that user may write by hand. It means that there is no magic in dependencies graph construction. Dagger 2 is less dynamic than the others (no reflection usage at all) but simplicity and performance of generated code is on the same level as the hand-written code.
Dagger 2 fundamentals
Here is the API of Dagger 2:
Also there are other elements defined by JSR-330 (stardard for Dependency Injection in Java) which are used in Dagger 2:
Let’s go through all of them.
@Inject annotation
First and the most important for DI is @Inject annotation. Part of JSR-330 standard, marks those dependencies which should be provided by Dependency Injection framework. In Dagger 2 there are 3 different ways to provide dependencies:
Constructor injection
@Inject is used with class constructor:
All parameters are taken from dependencies graph. @Inject annotation used in costructor also makes this class a part of dependencies graph. It means that it can also be injected when it’s needed i.e.:
Limitation in this case is that we cannot annotate more than one constructor in class with @Inject.
Fields injection
The other option is to annotate specific fields with @Inject:
But in this case injection process has to be called “by hand”, somewhere in our class:
Before this call our dependencies are null values.
Limitation in fields injection is that they cannot be private. Why? In short, generated code fills fields with calling them explicitly, like here:
Methods injection
The last way to provide depencencies with @Inject is to annotate public method of this class:
All method parameters are provided from dependencies graph. But why would we need method injection? It will work in situations when we want to pass class instance itself (this reference) to injected dependencies. Method injection is called immediately after constructor call, so it means that we are passing fully constructed this.
@Module annotation
@Module is a part of Dagger 2 API. This annotation is used to mark classes which provide dependencies - thanks to this Dagger will know in which place required objects are constructed.
@Provides annotation
This annotation is used in @Module classes. @Provides will mark those methods in Module which return dependencies.
@Component annotation
This annotation is used to build interface which wires everything together. In this place we define from which modules (or other Components) we’re taking dependencies. Also here is the place to define which graph dependencies should be visible publicly (can be injected) and where our component can inject objects. @Component in general is a something like bridge between @Module and @Inject.
Example source code for @Component which uses two modules, can inject dependencies to GithubClientApplication and make three dependencies visible publicly is here:
Also @Component can depend on another component, and have defined lifecycle (I’ll write about scoping in one of the future posts):
@Scope annotation
Another part of JSR-330 standard. In Dagger 2 @Scope is used to define custom scopes annotations. In short they make dependencies something very similar to singletons. Annotated dependencies are single-instances but related to component lifecycle (not the whole application). But as I said eariler - we’ll delve into scoping in next post. Now worth-mentioning is that all custom scopes does the same thing (from code perspective) - they keep single instances of objects. But also they are used in graph validation process which is helpful with catching graph structural problems as soon as possible.
Now a couple less important, not always used things:
@MapKey
This annotation is used to define collections of dependencies (Maps and Sets for now). Example code should be selfexplaining:
Definition
Providing dependencies
Usage
@MapKey annotation supports only two types of keys for now - Strings and Enums.
@Qualifier
@Qualifier annotation helps us to create “tags” for dependencies which have the same interface. Imagine that you need to provide two RestAdapter objects - one for Github API, another for facebook API. Qualifier will help you to identify the proper one:
Naming dependencies
Injecting dependencies
And that’s all. We’ve just got to know all important elements of Dagger 2 API.
App example
Now it’s time to check our knowledge in practice. We’ll implement simple Github client app which is built on top of Dagger 2.
The idea
Our Github client has three activities and very simple use case. Its whole flow:
- Type Github username
- If user exists show whole list of public repositories
- Show repository details after user presses on list item.
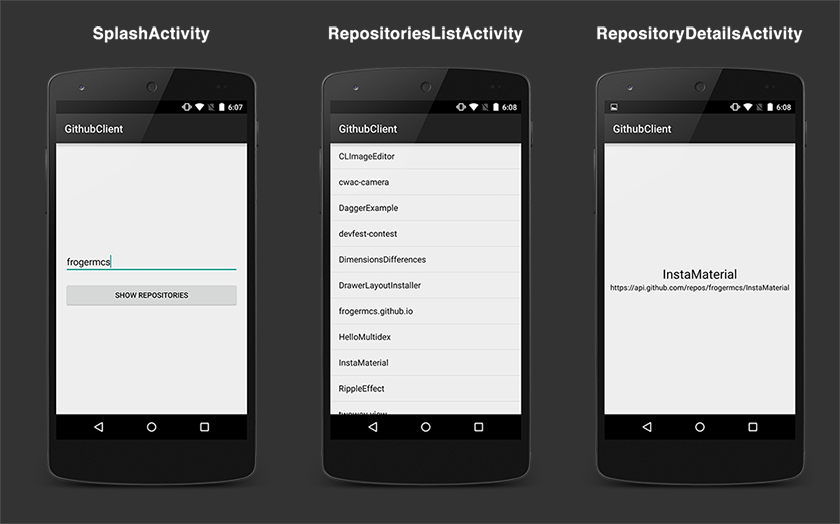
Here is how our app will look like:

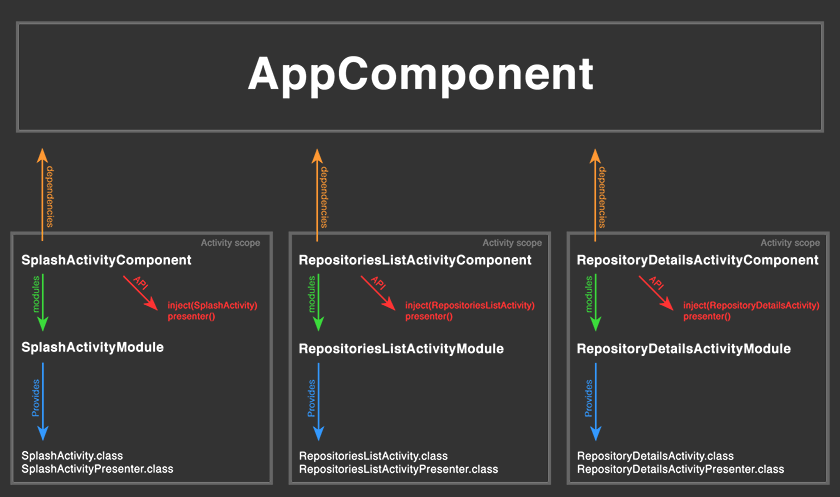
Under the hood, from DI perspective our app architecture looks like below:

In short - each activity has its own dependencies graph. Each graph (_Component class) has two objects - _Presenter and _Activity. Also each component takes dependencies from global component - AppComponent, which contains among others Application, UserManager, RepositoriesManager etc.

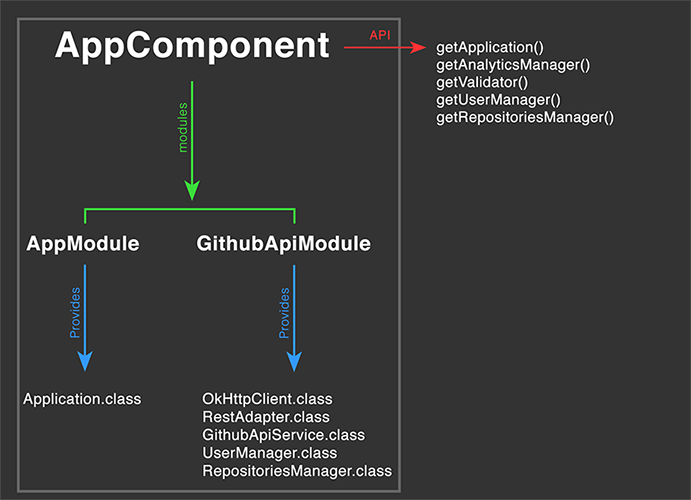
Speaking about AppComponent - just take a look closer to this interface. It contains two modules: AppModule and GithubApiModule.
GithubApiModule provides some dependencies like OkHttpClient or RestAdapter which are used only in other dependencies in this module. In Dagger 2 we can control which objects are visibile outside of component. In our case we don’t want to expose mentioned objects. Instead we’re just exposing UserManager and RepositoriesManager, because only those objects are used in our Activities. All is defined by public methods which return non-void type and has no parameters.
Examples from documentation:
Provision methods
Moreover we also have to define where we want to inject dependencies (via member-injection). In our case AppComponent injects nowhere because it’s used only as a dependency of our scoped Components. And each of them has inject(_Activity activity) method defined. Also here we have simple rule - injection is defined by method which has single parameter (defines instance in which we want to inject our dependencies), with no matter of name, but has to return void or passed parameter type.
Examples from documentation:
Members-injection methods
Implementation
I won’t delve to much in source code. Instead just clone GithubClient code and import it in the newest Android Studio. Here is a couple hints where to start:
Dagger 2 installation
Just check /app/build.gradle file. All we need to do is to add Dagger 2 dependencies and use android-apt plugin to make some bindings between generated code and Android Studio IDE.
AppComponent
Start exploring GithubClient project from GithubClientApplication class. In this place AppComponent is created and stored. It means that all single-instance object will exist as long as Application object (so all the time).
AppComponent implementation is provided form code generated by Dagger 2 (object can be created from builder pattern: Dagger{ComponentName}.builder()). And also this is a place where we have to put all Component’s dependencies (modules and other components).
Scoped components
To check how Activies Components are created just start exploring from SplashActivity. It overrides setupActivityComponent(AppComponent) where it creates his own Component (SplashActivityComponent) and injects all @Inject-annotated dependencies (SplashActivityPresenter and AnalyticsManager in this case).
Also in this place we’re providing AppComponent instance (because SplashActivityComponent depends on it) as well as SplashActivityModule (which provides Presenter and Activity instance).
The rest is up to you. Seriously - try to figure out how everything fits together. And in next post we’ll try to take a look closely on Dagger 2 elements (how they work onder the hood).
Source code
Full source code of described project is available on Github repository.
Author
Miroslaw Stanek
Head of Mobile Development @ Azimo
If you liked this post, you can share it with your followers or follow me on Twitter!