Dagger 1 to 2 migration process
Dependency injection frameworks in Android - is there anyone who has never heard about it? At almost every Android dev conference someone talks about this software design pattern. I am a big fan of DI but there are also people who complain about it. The main reasons why they do this are:
- dependency injection frameworks are slow - well, it was completely true a couple years ago in times of RoboGuice, when the whole dependency graph were created and validated in runtime. Now, when we have Dagger it’s not (completely) true. In Dagger 1 much of work (graph validation) is done in compilation time and objects creation process is done without reflection (it’s worth mentioning that recently presented Roboguice 3 also does much of his work in compile-time). Yes, it’s still a bit slower than hand-written code, but in average Android app it is almost imperceptible.
- DI frameworks requires a lot of boilerplate - it is true and it isn’t. Yes, we have to create additional code for injections, classes which provides dependencies etc. but thanks to them we don’t have to deal with objects constructors every time when we need them. Yes, in small projects DI frameworks are overkill, but benefits of dependency injection increase when you start dealing with scale.
- Other stuff like poor traceability, hard to read generated code etc.
As I said, I’m a big fan of DI and these drawbacks don’t discourage me to use of this desing patterns in projects which I work on. Until recently I used Dagger 1 with no problems. But when we decided to rewrite the Azimo (my newest project) completely and build it on top of DI framework, some disadvantages of Dagger 1 came to light. What exactly? We’ll be back to them shortly.
Fortunately for us Dagger 2 came to Not quite released, but stable, feature-completed state.
Dagger 2
I won’t deep to much into technical details of the second major version this dependency injector. Instead, just check official Dagger 2 website and Devoxx talk about The Future of Dependency Injection with Dagger 2 from Jake Wharton.
What was a super-important for me, Dagger 2 almost automatically helps to solve a couple of problems which could take a lot of time with Dagger 1:
Project proguarding
Yes, Azimo app has reached dex’s 64k methods limit. At the beginning we started to use MultiDex solution but according to its flaws we had to consider using Proguard. What forced us to this decision?
Only the MultiDex.install(this); called from MultiDexApplication’s onCreate() method takes almost 4000ms on Nexus 7 with older Android version (4.4) (Lollipop supports MultiDex natively so it takes only 1ms on the same device). Also app build time increased dramatically (almost 2mins per gradle assembleDebug, even if we changed only single line of Java code). Why it takes so long? In short - MultiDex plugin has to scan sources everytime we change someting to decide which code should be put in first .dex file and which can be moved to another.
So we decided to use Proguard and boom… there is no simple receipe to handle Dagger 1’s generated code in proguard rules. Yes, we can use @Keep annotation from Squad leader but still we had to spend some time to update our code and remember this rule in the future.
Dagger 2 answer: there is no single rule (!) required by Dagger 2 in proguard. Everything just works. Dagger 2 generates fully traceable code and doesn’t use reflection - it’s 100% Proguard friendly.
Other things
Here are less (but still) important things which convinced us to Dagger 1 -> Dagger 2 migration:
-
Code generated by Dagger 1 is hard to understand. Yes, we can trust the authors but sometimes it’s good to know what resides under the hood. Also this code isn’t fully traceable what means that we can’t use i.e. “find usages” functionality in our IDE.
Dagger 2 generates entire stack that looks as close to hand-written DI code as possible. Finally we can investigate this code to better understand how it works! -
Maybe Dagger 2 is less flexible but the API is more clear and simple than Dagger 1. Our team still grows and in the moment when our app has been rewritten from scratch it’s important to understand whole architecture to move as fast as possible with as less bugs as possible. Thanks to Dagger 2 learning curve is a little less steep.
-
Dependencies graph composition time. Maybe it isn’t big deal for us right now - graph in our app is composed in ~80ms on Nexus 7 (Android 4.4) device. But Dagger 2 reduced this time to ~40ms.
Dagger 1 to Dagger 2 migration process
A couple months ago Antonio Leiva created short series of posts (post 1, post 2, post 3) which explains usage of dependency injection in Android project built with MVP (Model-View-Presenter) pattern. I decided to clone his project from Github and update it to Dagger 2.
Dependencies graph
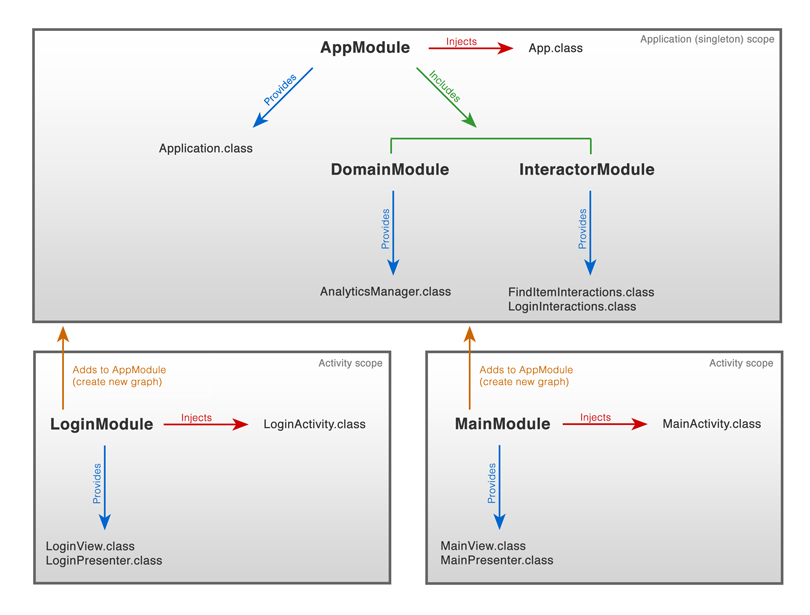
To better understand how Dagger 1 works in this example I created image of dependencies graph used in DaggerExample project:

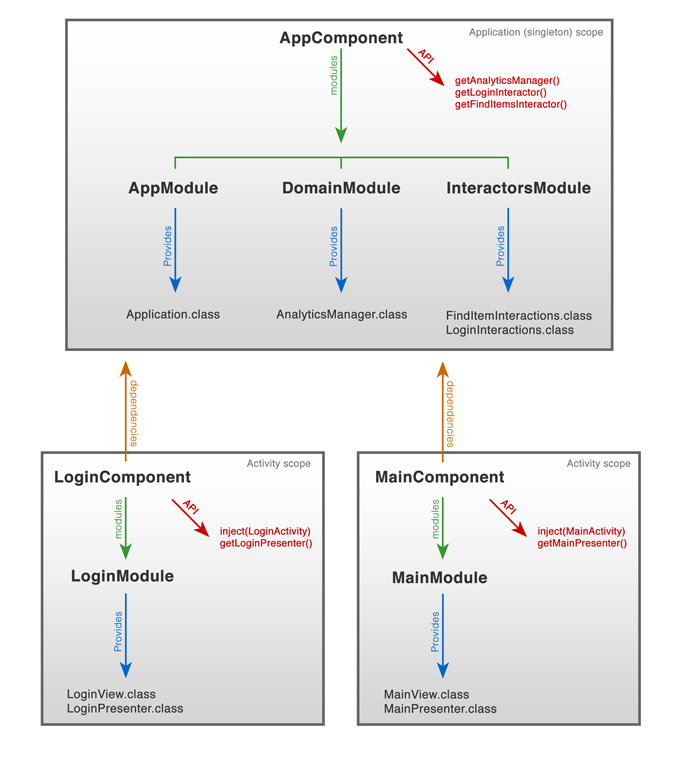
Now take a look at the same project, but with Dagger 2:

Can you see the similarities?
The main worth mentioning difference between Dagger 1 and 2 are Compontents. In short they enumerate all of the types that can be requested by callers. But Component interfaces declare only that something is provided and modules declare how it is provided, so Modules are still responsible for creating objects. Components are just a public API for our graph.
Migration process
Build, dependencies
First of all we have to update build.gradle files to add new dependencies. At the moment when I’m writing this post Dagger 2 is in active development and only Snapshot version is available. That’s why we have to add Sonatype snapshot repository:
build.gradle:
The android-apt plugin assists in working with annotation processors and allow to configure a compile time only annotation processor as a dependency, not including the artifact in the final APK. Also it generates source paths for generated code which is visible and traceable by Android Studio.
app/build.gradle file with dagger and android-apt plugin should look like below:
Modules
This is the simplest step in migration process. Modules become as simple as possible. They just need a @Module annotation (without any additional params), and @Provides annotation for providing objects.
Here is AppModule class:
Dagger 1:
Dagger 2:
What is the difference? injects param is moved to the Component, as same as includes. All Module params should be deprecated and removed soon.
Components
As I said, it’s something new in Dagger 2. In short it’s kind of public API for our graph. Take a look again at the seconde picture of our graph. Here you have the implementation for each @Componentclass:
AppComponent:
LoginComponent:
MainComponent:
We used @ActivityScope annotation. In short it’s replacement for @Singleton annotation used in local subgraphs. In Dagger 1 for example we had singleton object of LoginPresenter. And it was true, that this object was a singleton. But it was some kind of local singleton - it lives as long as scoped graph (which was set to null in onDestroy() method in example code).
@ActivityScope is used just for semantic clarity and it’s defined in our code:
ObjectGraph
There is no more ObjectGraph in Dagger 2. Now Components took his place. Exactly the code generated from them with DaggerComponent_ prefixes. It means that now we have to deal with generated code (but only in this place).
Keep in mind that DaggerComponent_ classes are generated only when whole code is valid, so you won’t see them until you fix all errors.
How it looks in practice?
In lines 16-18 our graph is built. It replaces ObjectGraph.create(getModules()); from Dagger 1.
Line 19 injects App object into the graph (and all @Inject in this class are satisfied in that moment).
Here is an example of local graph (from MainActivity.class):
MainComponent depends on AppComponent so we have to provide this object explicitly. If Module has no default constructor you have to provide them too (like MainModule).
And the migration is done. In case we missed something here is complete pull request with magration process. Keep in mind that this article doesn’t cover more complex solutions and all capabilities of Dagger 2. Here you have some links which can help you to better understand how Dagger 2 and dependency injection works:
- The Future of Dependency Injection with Dagger 2
- Dagger 2 doc by Gregory Kick
- Dagger 2 official website
And that’s all. Thank you for reading. I hope to deep Dagger 2 even more, so see you soon! 😃
Source code
Full source code of described project is available on Github repository.
Author
Miroslaw Stanek
Head of Mobile Development @ Azimo
If you liked this post, you can share it with your followers or follow me on Twitter!