InstaMaterial concept (part 9) - Photo publishing
This post is the last part of a series of posts showing Android implementation of INSTAGRAM with Material Design concept. Today we’ll finally finish our project by creating the last elements - PublishActivity and SendingProgressView. This functionality is presented between the 41st and 49th second of the concept video.
APK file which has been built from code described in today’s post is available here. Yes, this is the final version of InstaMaterial. 😄
Here is the final effect implemented in this post (video which presents the whole project will be shown in next, the summary post):
Introdution
This post will be a little bit different than the previous. I won’t focus on every single line of changes which was made. A lot of code is a simple boilerplate, another part was described in one of the previous posts. That’s why I’ll try to focus on single details, not the complex change which was made.
Uploading progress
Let’s start with the biggest change introduced in current app version - SendingProgressView. This element is probably the most custom View in our project. Good, we have the opportunity to practice some drawing techniques.
This view can have one of four states:
- STATE_NOT_STARTED - nothing should be drawn here
- STATE_PROGRESS_STARTED - here we have to draw arc which corresponds to current loading progress
- STATE_DONE_STARTED - here we should animate done elements (ingoing background and checkmark)
- STATE_FINISHED - static view with full progress circle and done background.
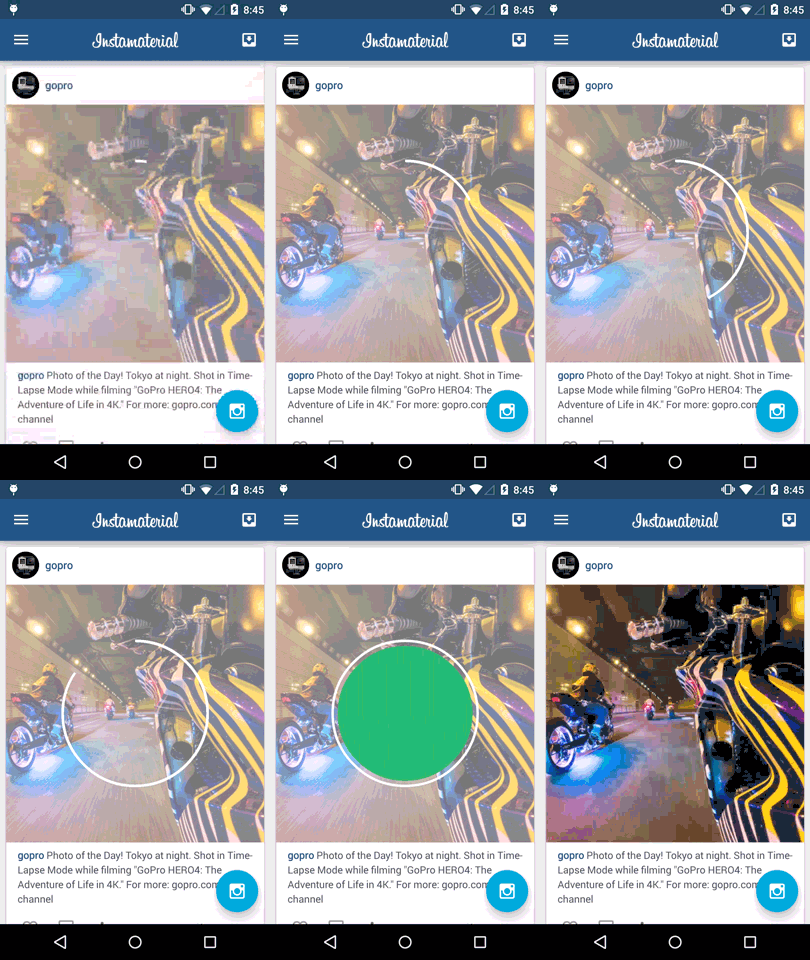
Here is how it looks in practice:

Before we start implementation of our SendingProgressView there is one very important rule about drawing. If you want to achieve the best performance, you have to separate drawing operation and tools initialization. While onDraw() can be called frequently, we shouldn’t do any allocation inside it. Allocation process may lead to a garbage collection that would cause a stutter (GC operations cause application freeze).
Two best places for making initializations are constructor and onSizeChanged() method (for objects which depends on View’s size).
ProgressBar

Let’s start from progress bar and STATE_PROGRESS_STARTED state. It’s simple arc stroke. All we need to prepare is a paint with STROKE style (we want to draw only view bounds, without filling), antialiased (because it’s circle shaped), with given color and stroke width:
This method is called from SendingProgressView constructor (we prepare paint only once).
Drawing progress is even simpler. Just one line of code:
progressBounds param is rectangle defined to fill all given view size (and is measured in onSizeChanged()). The rest is straightforward.
And this method is called inside onDraw():
Probably you’re wondering why we use tempCanvas/tempBitmap instead of canvas given in onDraw() parameter. It’s done intentionally and is used for masking process. We’ll back to it in a a moment.
According to the fact that our project is only mockup we have to simulate progress change. Here is the animator, which will do this:
It’s also initialized in contructor. In case you missed post about ObjectAnimators simulateProgressAnimator will animate float value from 0.f to 100.f in 2000 miliseconds. Progress is update by setCurrentProgress(float) method.
All we have to do right now is to call:
Done animation
Now we’ll prepare “done” animation, which should be fired immediatetely after progress reaches 100%. Take a look what exactly we want to achieve:

Pretty simple, right? Just circular background with checkmark image. But here is one important detail. In animation time both, background and checkmark are coming form the bottom. In this time we should clip views in circular shape to avoid crossing them with progress circle. That’s why we have to play with masking process. In short, we have to provide circle mask which will cut animated views in intended way.
To do this we have two recomended ways - by using a shaders or by playing with Porter-Duff blending modes. For the first one, take a look on Romain Guy’s recipe.
In our project we’ll try blending modes way.
Porter/Duff Compositing and Blend Modes
In short this process is all about combining two images. PorterDuff defines how to compose images based on the alpha value (Alpha compositing). Just check this article: Porter/Duff Compositing and Blend Modes to see what possibilities of blending we’ve got.
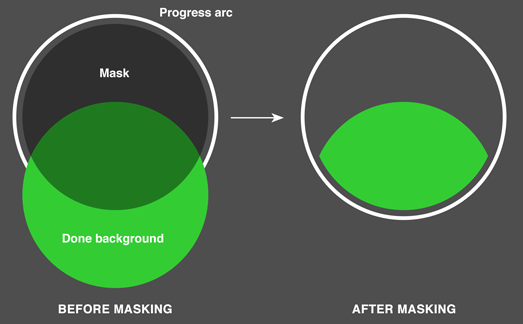
In our view we want to apply the alpha mask and that’s why we use PorterDuff.Mode.DST_IN. In practice this mode will clip our image to exact shape of applied mask. Here is visualisation of it:

To implement this effect let’s start with Paints configuration:
First one is used for done background, second for drawing checkmark bitmap and the third for masking. This method is called in our View’s counstructor.
Now let’s prepare our mask (called from onSizeChanged() method):
And finally let’s draw frame for our done animation:
As you can see first we’re drawing background and checkmark, then the mask. postInvalidate() called in onDraw() method schedules next frame of animation. Current position for background and checkmark is taken from two animators:
Now a couple words about tempCanvas. As I said, we use it intentionally. By using PorterDuff and blending modes we play with alpha channel. And this method works only in a Bitmaps filled by transparency. When we draw directly on canvas which is given as onDraw() parameter, the destination is already filled by the window background. That’s why you can see black color instead of nothing (transparency).
The rest of code is pretty straightforward. Instead of reading about it just check the full source code of SendingProgressView.
Final result:

Activities stack management
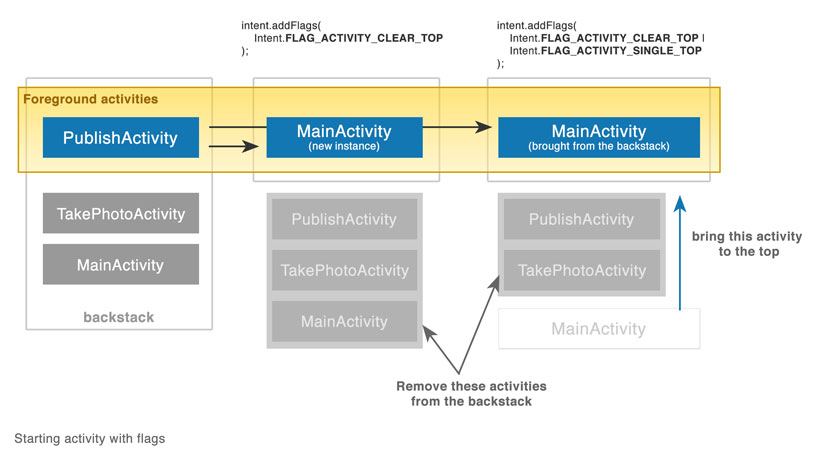
As it’s showed on the concept video, when user clicks done button, MainActivity is brought to the top (instead of opening new Activity) and content is scrolled to the first element. Here is the short snippet how to achieve this effect with Intent flags:
-
Intent.FLAG_ACTIVITY_SINGLE_TOP- this flag keepsMainActivityfrom restart if it is already running at the top of the history stack. Without this flag, the second one removes and recreates MainActivity. -
Intent.FLAG_ACTIVITY_CLEAR_TOPcauses that if the activity being launched is already running, then instead of launching a new instance of that activity, all of the other activities on top of it will be closed and this Intent will be delivered to the (now on top) old activity as a new Intent. In our case this method inMainActivitywill be called:
So why do we need FLAG_ACTIVITY_SINGLE_TOP flag? Without it also MainActivity will be removed from stack. And as I said, then it will be recreated.
Here is how it works in practice:

And well… Actually this is everything for today. Of course commit with the recent changes is much wider than code described in today’s post. Bo almost all techniques were described in previous posts of this series.
Congratulations, we’ve just finished implementation of Instagram with Material Design concept from Emmanuel Pacamalan. And we proved that almost all effects presented in this wideo are possible to achieve also in older Android versions. Thank you all for the reading and sharing your thought. I hope to see you here in the next future projects! 😄
Source code
Full source code of described project is available on Github repository.
Author: Miroslaw Stanek
If you liked this post, you can share it with your followers or follow me on Twitter!