InstaMaterial concept (part 4) - Feed context menu
This post is part of a series of posts showing Android implementation of INSTAGRAM with Material Design concept. Today we’ll create context menu for feed items opened from “more” button. This element is presented on 18 to 20 seconds time period from the concept video.
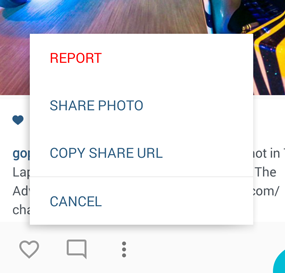
This is the final effect described in today’s post (for both Android Lollipop and pre-21 versions):
Warming up
Before we start working with context menu let’s do some refactoring.
As @Riyaz pointed out in his comment the code for Toolbar in MainActivity and CommentsActivity is identical. Thanks to <include /> tag we can export part of layout to new file and re-use it wherever we want.
This is how it looks like in practice. In our project we create new file res/layout/view_feed_toolbar.xml:
And all we have to od right now is to use it in activity_main.xml and activity_comments.xml like below:
It’s worth mentioning that we can override properties in <include /> tag (they will override properties in root view from included file). Just exactly like we did with android:id property (by the way we had to do it only for proper layout positioning in RelativeLayout).
Here is the commit with described refactoring.
Context menu
Initial config
As usual let’s make some preparation before we start coding. Here is the screenshot of desired effect:

First of all we have to add another button to our item_feed.xml layout and handle its onClick() event. Pretty straighforward, just copy and paste some previous code and add missing three-dots image (I used this one from official Material Design icons pack). Here is full commit with these changes.
Context menu layout
Let’s start from our view’s layout. One more time we’ll use <merge /> tag and construct our view from .xml and java code.
res/layout/view_context_menu.xml is simple:
It’s just four buttons with shared style defined below:
Nothing special. The same with source code for our view:
At line 20 we have a little mock for binding view with model. In real project probably it could be more complicated.
dismiss() method from line 30 helps us to remove our menu from parent view. The rest is pretty straightforward.
Ninepatch background
As you problably noticed our menu has background with shadow. In Android Lollipop we can achieve this effect natively by assigning elevation value. Unfortunatelly it works only on the newest Android system, even if we use ViewCompat.setElevation(); (if you dig into ViewCompat implementation you will find simple if statement which checks if method is invoked on the Lollipop or one of the previous version and it does nothing in the second case 😉).
That’s why for our menu’s background we’ll use 9-patch background. For those who haven’t used this before in short it’s a graphic with defined rules for stretching and content placing. It helps to create images which can be resized without losing sharpness and quality (Android uses this method i.e. for buttons background).
Here is our background image:

Left and top lines define area which should be stretched (we define only this area which can be safety removed or duplicated vertically or horizontaly). Right and bottom lines define content area (place where lines start and end will be translated to view paddings).
Here you can find more detailed explanation about NinePatch.
Selectors
The last things in context menu layout are onClick selectors of course. Again it’s no more than copy and paste from existing code (two different files for Android Lollipop and pre-21 versions):
res/drawable/btn_context_menu.xml/:
res/drawable-v21/btn_context_menu.xml/:
Context menu manager

Great, now when we have whole layout for our context menu let’s prepare FeedContextMenuManager for easy management. Here are the requirements:
- Only one context menu should be visible on the screen
- Context menu should appear after we click on “more” button and disappear after we click this button again
- Context menu should appear right above the clicked button
- Context menu should disappear when we start scrolling feed
The simplest way to achieve the first point in to implement FeedContextMenuManager as a singleton pattern.
Our manager will handle contextMenuView reference so the most important thing is to remove it in the right moment. For this we can use OnAttachStateChangeListener and its onViewDetachedFromWindow(View v) method. Thanks this view reference will be removed while we dismiss it or when the activity which is hosting this menu will be destroyed.
For showing and hiding view we’ll pretty simple method:
We will invoke it directly from “more button” onClick callback.
Great, now let’s think about showing our menu. First of all we have to take care about “isAnimating” state (in both hiding and showing cases). It’s important to block our manager while animation is executing to prevent doing it twice or more in the same time (and to avoid bugs connected with this).
The rest is in code (some explanations below):
We have three phases here:
- Context menu initialization - constructing object, setting up some stuff and adding menu to our root view. For the last one we used
android.R.id.contentwhich always points on the root view of the activity. Adding view is pretty simple in our case becase we know that our root view isRelativeLayout(it will work also withFrameLayout). In the other cases we have to prepare more complex solution. - Menu positioning - we know that initially our menu is placed on top-left corner of the activity. Also we know the opening view and his location on the screen. It’s just a simple math. The most important thing in this moment is to start positioning in the proper moment. We have to do this in
onPreDraw()callback to make sure that our view is layed out. Only then we can usegetWidth()orgetHeight()methods on our view (before that these methods return 0). - Menu animating - nothing more than
ViewPropertyAnimator
Hiding menu is even simpler and don’t need to be exaplained:
The last thing from our requirements is hiding view while users scroll the feed. We’ll extend RecyclerView.OnScrollListener class for this:
As you can see it’s a little tricky. In the same time when our menu is hiding we’re using setTranslationY(). Thanks to this our menu follows scrolling feed like here:

All we have to do right now is to make usage from our FeedContextMenuManager. Here is the last commit which shows how we did it in our project. That’s all for today. 😄
Source code
Full source code of described example is available on Github repository.
Author: Miroslaw Stanek
If you liked this post, you can share it with your followers or follow me on Twitter!